


Gluten-Free Fougasse: Do What's Best For You

“Gluten Free” has become one of those culinary buzzwords, a phrase latched onto by marketing executives or disdained by waitstaff. There’s this assumption that “going gluten-free” is a dietary trend, a ridiculous decision made by people of privilege*. The truth is, it’s a lot more complicated than that. Having Celiac’s Disease is a very clear indication that any amount of gluten is harmful and potentially dangerous to your body. Those with this condition have to learn how to read ingredient labels and protect themselves at restaurants, potlucks, and even family dinners. There’s no grey area here: gluten is harmful. *(That said, privilege absolutely plays a part in the ability to make dietary modifications, let’s not kid ourselves here.)
Beyond Celiac’s, there are a lot of people who have felt their bodies respond to gluten in not-so-pleasant ways. I’ve found that, after over a decade of chronic illness, my body is just generally more sensitive to everything, and that eating gluten makes me feel heavy and sluggish and a bit sick. Others find that it triggers migraines or inflammation, perhaps makes them dizzy or fatigued, or even very sick to their stomach. I have always understood listening to the messages our bodies send us; no diet is a magical panacea that makes everyone feel wonderful. When it comes to gluten intolerance or other bad reactions, once we have the knowledge of the source, we become empowered to make our own health decisions.

That’s why when someone says they are gluten-free, I take them seriously. I trust them to know their body. I do not need an official celiac diagnosis to hear that gluten is just not a good thing for them. That’s also why I like to share gluten-free recipes from time-to-time, so that it becomes easier to accommodate your own needs or prepare food for someone you care about who needs to avoid gluten for one reason or another. Having someone remember and accommodate my dietary needs makes me feel so supported, appreciated, and loved!
When it comes to baked goods made with raising agents (like muffins, cookies, cakes, quickbreads, etc.), I’ve found the substitution to be actually pretty easy. I use a simple recipe of one part white rice flour (by volume, not weight) to one part tapioca starch. For every 4 cups of flour mixture, I add one tsp. Xantham gum and then mix it all really well. I substitute this cup-for-cup in many of my favorite recipes. Sometimes I also add a little potato starch or almond flour to recipes to help them stay moist longer (as gluten-free treats have a tendency to dry out more quickly), but that’s really all there is to converting most baking recipes to being gluten-free. Bread, however, is a different story. The mechanism for bread rising is the gluten that helps air bubbles form and gives us so many delicious textures, from fine sandwich bread to big, hole-filled sourdoughs. The reason we knead bread is to activate the gluten, which turns the dough silky smooth and provides that necessary structure. Simply substituting gluten-free flour into a normal bread recipe will result in something more akin to a brick.

The solution? Adding more xantham gum, which helps those bubbles to form. Handling the dough gently so as not to knock any bubbles out. Using a hearty blend of gluten-free flours to impart both taste and texture. One of the best parts of baking gluten-free bread is that there is no reason to knead it! Since the xantham gum is already activated when mixed into the dough, kneading would be pointless and may actually result in a denser bread. Just mix everything together really well and let it rise. It’s that easy. And with gluten-free diets on the rise, it has become easier and easier to source ingredients. I can now find pretty much everything I need for a gluten-free flour mixture at my local supermarket, no need to go to a specialty store or order online!

Gluten-Free Fougasse
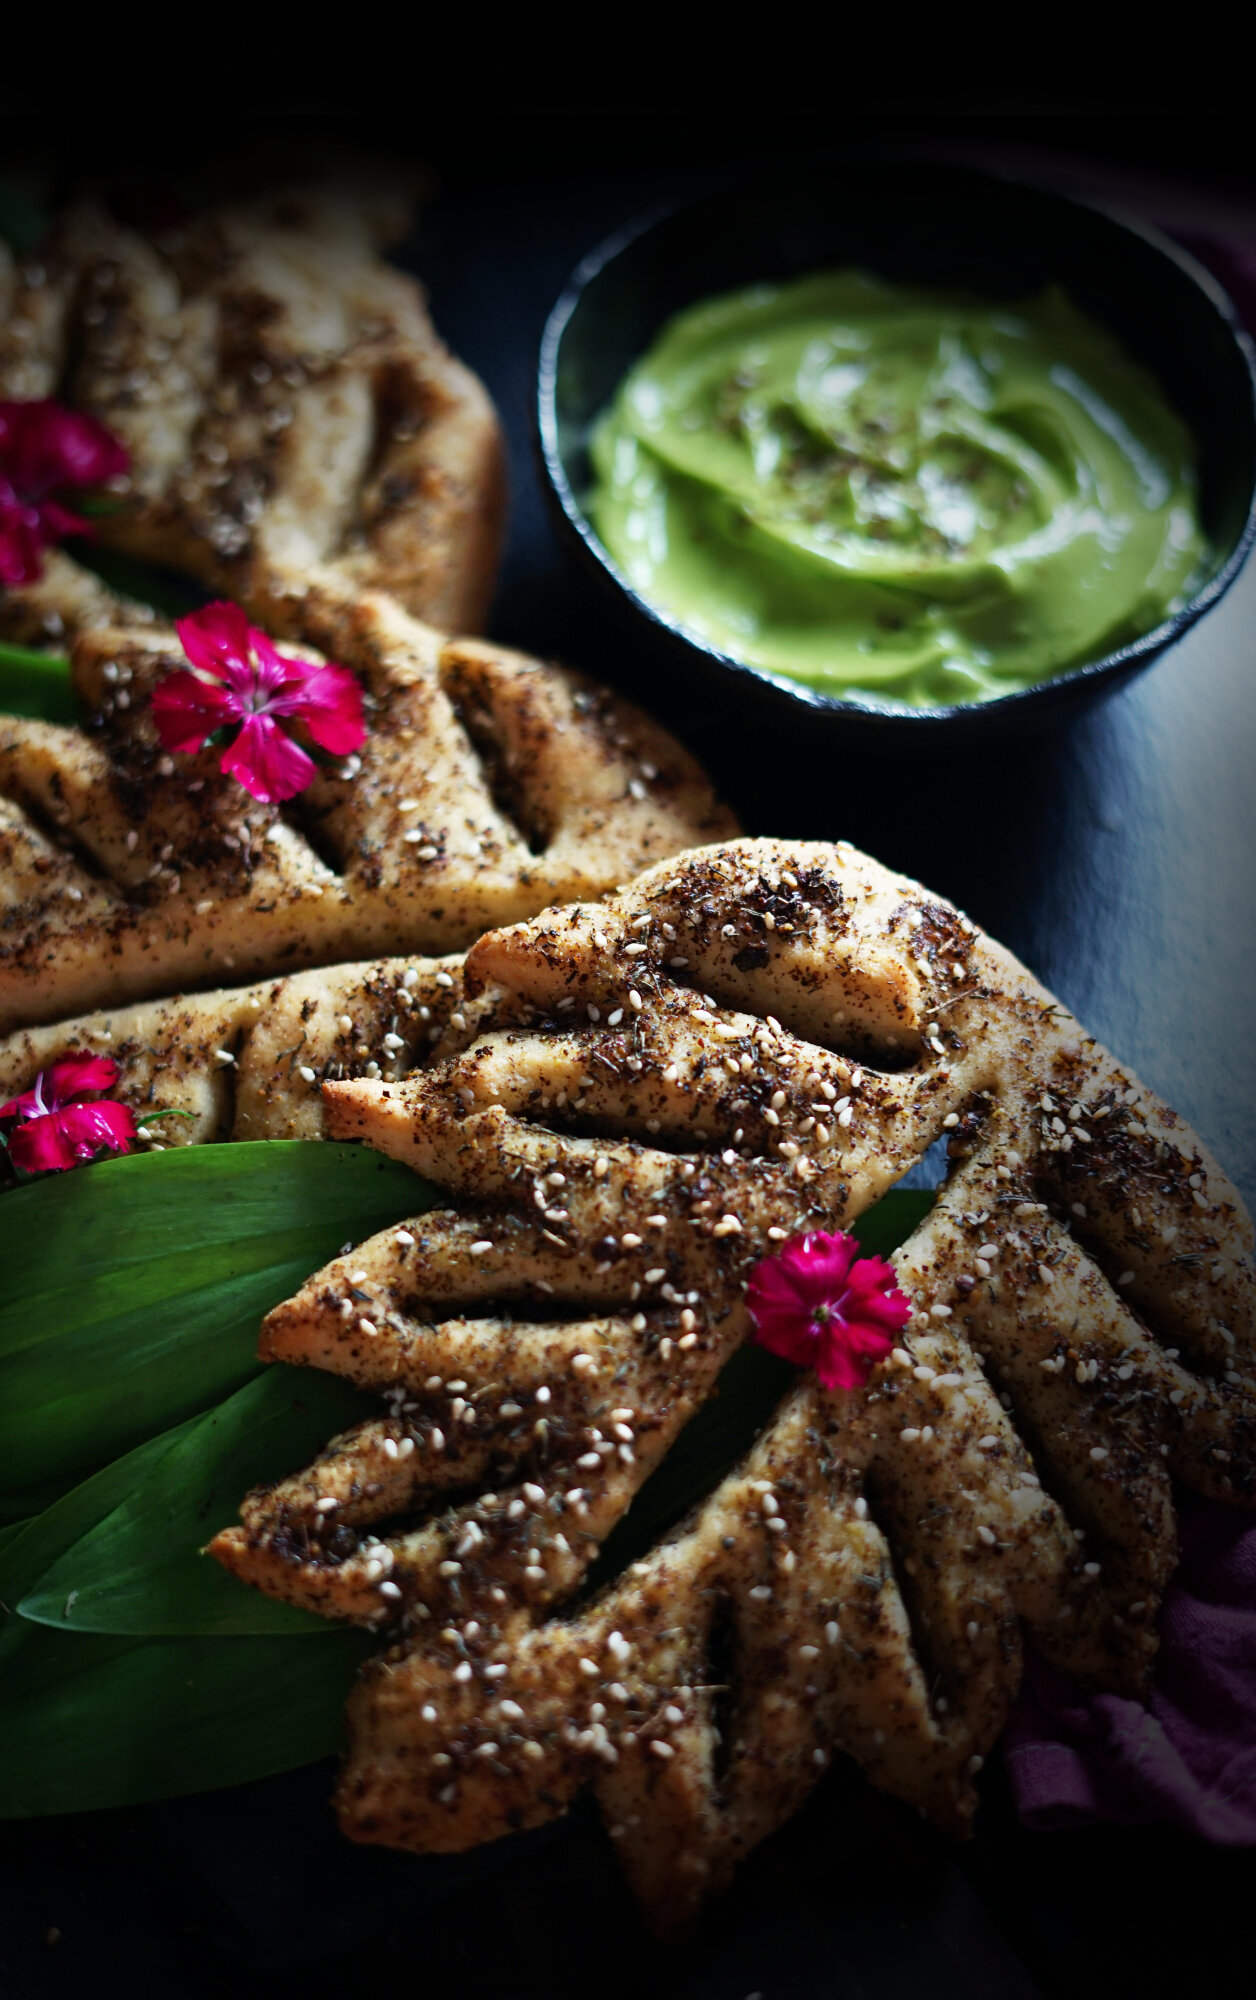
This gluten-free bread recipe is for fougasse, a charming leaf-shaped bread that’s cousin to focaccia, but a bit more flamboyant. It’s chewy and flavorful and perfect for a picnic. I’ve sprinkled mine with homemade wildcrafted za’atar seasoning and extra sesame seeds for lots of flavor! This recipe is based on several recipes in Gluten-Free Artisan Bread in Five Minutes A Day, a fantastic reference book for gluten-free bread baking. (If you’ll be doing much gluten-free bread baking, I highly recommend this book!) After fougasse dough is risen, it should be handled delicately, being gently pressed and smoothed with a wet finger to form the shape desired rather than rolled or stretched so as not to lose any of those precious bubbles. If you want to make fougasse with all-purpose flour, don’t try substituting it for the flours listed here. Instead, you’ll need to find a recipe specifically for it.
Ingredients:
2 c. white rice flour
¾ c. white sorghum flour
¾ c. tapioca flour
½ c. potato starch
4 tsp. xantham gum
¾ Tbs. active dry yeast
2 - 2 ½ tsp. Sea salt
2 c. lukewarm water
¼ c. olive oil, plus more to drizzle
¼ c. homemade za’atar seasoning
1 Tbs. sesame seeds
Directions:
Whisk together the flours, xatham gum, yeast, and salt in the bowl of a stand mixer fitted with the paddle attachment. Add the water and olive oil and mix until everything is evenly incorporated. Continue to beat for about 10 minutes. Dough should be smooth and a little wet. (Add more water if needed.)
Cover the bowl with plastic wrap and allow the dough to rest for two hours at room temperature. Meanwhile, stir together the sesame seeds and za’atar seasoning.
Prepare a large baking pan with a sheet of parchment paper sprinkled with cornmeal. Flour your hands with white rice flour and gently divide the risen dough into 4 equal portions. (Keep the others covered while you work with one.)
Gently pat a piece of dough into a ball, then shape into a leaf shape on the baking parchment. It should be about ½” thick. Carefully wipe a knife with olive oil and cut a slit down the middle of the shape, leaving 1” of dough on each end, where the main vein of a leaf would be. Gently pull the dough slightly apart to open the slit. Cut smaller angled slits around the outside, re-oiling the knife with each cut. You can cut some small snips into the edge as well to add further shape to the leaf. Brush with olive oil and sprinkle with the za’atar and sesame mixture. Cover with plastic wrap until you are finished with the other three mini-loaves.
Preheat the oven to 475F and place a small loaf pan on a lower rack where it won’t be obscured by the baking sheet.
Let the shaped breads rest for thirty minutes, then remove the plastic covering and place the pan in the oven. Pour 1 cup of boiling water into the loaf pan and close the oven door. Cook for 15-20 minutes, or until the bread is golden-brown. It’s best to eat the bread the same day if possible, since gluten-free bread doesn’t keep as well as normal bread and has the tendency to get a bit dry and hard (though re-heating in an oven or microwave with a little steam softens it right up again.)
Wild Ramp Aioli:
This bright chartreuse dip is the perfect accompaniment to chewy bread and rounds out a wonderful late spring picnic. Ramps are wild onions and are wonderful to cook with, but please be mindful about foraging or sourcing your own. Ramps are threatened by the demand for them and there are too many foragers that prioritize meeting that demand over sustainability. One way to be more sustainable is to only harvest a leaf or two from each plant (as opposed to digging up the whole bulb.) Harvest only on private land with permission, and only take leaves from 1 in 10 plants at the most. It’s not sustainable to forage for ramps on public lands anymore, unfortunately. (I got mine from someone who cultivates them on their homestead!) This recipe does call for three bulbs, but the vast majority of the flavor comes from leaves. It’s surprisingly easy to make as long as you have a good blender, and can be whipped up in just a few minutes. This recipe makes a fair amount and should be refridgerated and eaten within a week (though it’s so delicious I doubt it will last that long.) Enjoy!
Ingredients:
45 g wild ramp leaves (about 30 leaves)
½ c. canola oil
½ c. avocado oil
Salt
3 ramp bulbs
2 egg yolks
1 tsp. Mustard
1 Tbs. lemon juice
Salt and lemon to taste
Directions:
Bring a medium pot of water that’s been well-salted to a boil. Meanwhile, rinse the wild garlic leaves and set up a bowl of ice-cold water.
Put the ramp leaves in the boiling water and blanch for 35 seconds, then drain and plunge into the ice water. Once the leaves are fully cool, strain them out and pat with a clean dishtowel to dry.
Put the ramp leaves in a blender with both kindss of oil, then blend until smooth and vibrant. Pass the oil through a sieve.
Add the ramp bulbs, egg yolks, mustard, and lemon juice to a high-speed blender or food processor. Blend until smooth. Keeping the machine on, add the oil mixture very slowly in a fine drizzle, allowing it to be incorporated as you go. This will emulsify the oil to make aioli. Don’t rush it! Once all the oil has been incorporated and you have a nice thick green aioli, season as needed with salt and more lemon juice, then serve with bread or veggies.
Note: As an Amazon Associate I earn from qualifying purchases on some linked items. All are items that I use myself and would recommend to others, and this service is provided at no extra cost to you! Read more about this program here.
Love what you’ve read here? Don’t forget to Subscribe to get frequent updates of new posts!
Huge thanks to my Patrons that make sharing all of these lovely posts with you possible (without all of the pop-ups and ads that make browsing other blogs so annoying). If you’re feeling generous, you too can support the wonder with a monthly contribution of your choice. Even $1 helps a lot! Your donation will help to fund this blog as well as my surprise free events and gifts for strangers. Learn more about this program at the link below:

Join me for a little winter night magic as we bake this cake full of rich seasonal flavors and black cocoa!